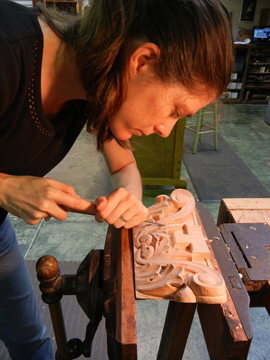
You will need to select a piece or wood for the first step. Next, make the cuts. Using a step-by-step video, follow along as the expert guides you through the process. You will be able to carve the face more realistically by using the progressive cut. It is important to create a lifelike facial expression by adjusting the position of the noses in the wood. You can add realistic details to your face by using colored dyes or shellac.
Hardwoods
Before carving a face out of wood, it is important to consider what type of wood you will be using. Hardwoods are a class of trees with broad leaves that grow in a variety of climate zones. Hardwoods are suitable for various purposes due to their density, strength, appearance and versatility. Hardwoods can be more expensive, but they are also more durable and resistant to fire.
You might want to try wood carving if you are new to the art. These woods are easy to work with, and are great for beginners. But, softer woods may not be as durable or beautiful as hardwoods. You should experiment with different types before you settle on a single type.
Softwoods
The first step in carving a wooden face is selecting the softwood to use. Softwoods are more difficult to carve, and often will have many knots. You can also break them more easily if you use large strokes. An experienced carver may cut small pieces of wooden, which can reduce the detail. While this isn't a major issue, it is something to be aware of.
Some hardwoods can be more difficult than others. Aspen, butternut, and basswood are among the easiest to work with. You should use knives that have a greater bevel. Softwoods can be worked with more easily than hardwoods. They can be cut along or across their grain. The wood that you use for carving will determine the quality of the finished product.
Colored Dyes
You can create a bright, detailed finish to a wood carving by using colored dyes. These dyes are available in a variety colors that can be mixed with water or alcohol to create unique colours. For lighter woods, you can use colored dyes mixed with shellac. To clean the brushes after applying dyes, be sure to ventilate. You can also use paste wax. Be aware that an excessive glossiness may distract from your work. Use 0000 steelwool to get rid of any excess glossiness.
Wood dyes are available in several types and can be applied with ease. Wood dyes are compatible all topcoats, and they are easy to use. They can solve common finishing problems. They are easy-to-mix and apply because they are available in a wide range of primary colors. They're also available in a variety of shades and can be mixed according to individual preference. You can even mix them to create your own colors.
Shellac
You should always have a jar of shellac handy before applying it to wood carvings. Although you can buy a jar of the stuff, it is easier to use a brush to apply it. Two-pound cuts will suffice. Because it builds up slowly and reduces brush marks, a two-pound cut will do. A thicker cut is better than a thin one because shellac can be very water-thin. Make your own pad out of small pieces of cotton and lintfree cloth. This will ensure you get the right amount. Now dip your brush in the Shellac.
Use shellac to add color and highlight grain. Shellac comes in various colors, so you can create custom blends by mixing different shades of the resin. You can also darken the shade using extra coats. Shellac is not like other wood finishes. It won't become yellowed or cloudy over time. Shellac is also more durable, which means you can make even more faces. And you can do this with any kind of wood carving project!
Gouges
There are many sizes and shapes of gouges. The straight and the palm gouges types are the most commonly used. Straight gouges should be held by hand. While palm gouges have shorter shafts or handles, they can be used with your hands. Hand held carving is easier with the shorter handles. These palm gouges can also be called veiners. They are perfect for carving faces into wood. These are some important things to remember before you begin carving.
You must first know how to select the right gouge. The gouge you choose must be capable of creating a shallow, v-shaped groove. Use a sharp, narrow edged tool. Gouges can be categorized by their size. A 3/10-inch gouge will produce the same size cut as a 5/10-inch gouge. The scoop between the edges gets deeper as the first number is increased and the sweep becomes more curvy. A gouge with a small sweep will be able to carve a shallow v-shaped profile.
FAQ
How can I learn basic woodworking skills
It is an excellent way to learn how to build furniture. You can make a simple bench yourself. This project can be done with any kind of wood that you have at home. If you don't know what kind of wood to use, then go ahead and buy some cheap pine boards from Home Depot or Lowes. After you've built your bench, you'll want to sand off all the rough edges and finish it with a stain or varnish.
What kinds of woods are good for making furniture?
Woods are classified according to their hardness. Softwoods are pine, cedar and cypress. They are great for outdoor furniture as they resist rot. Hardwoods include oak, maple, mahogany, and teak. They're generally used indoors because they won't weather well outdoors.
How can you calculate woodworking pricing?
It is essential to calculate costs as accurately as possible when pricing any project. Make sure you're getting the best prices on materials. You should also consider other factors that could impact the cost of your project, such as experience, skill level, time, and money. Check out our guide on the average cost of common DIY projects to get an idea of how much you can spend on woodwork projects.
What kind and type of wood should i use?
The most commonly used woods for woodworking are oak, maple, cherry. Each type of wood has its own unique characteristics that can affect the final product's appearance. Oak tends to be harder and darker than other woods. Birch is soft and lightweight, while mahogany is denser and heavier. You can also choose between solid wood and veneers. Veneers are thin wood sheets that are glued together to form one layer.
What's the difference?
Hobbyists are passionate about making things from wood, while professionals tend to be more focused on the quality and craftsmanship of their work. Hobbyists are proud of their creations and will often share them with family members and friends. Professionals will spend hours researching designs and then begin to create a project. They will pay attention to every detail, from selecting the best materials to finishing the project perfectly.
Are there any other things I should know regarding woodworking?
It's easy to underestimate the amount of work involved in making furniture. The hardest part of the process is actually finding the right wood. There are so many options for wood, it can be difficult choosing the right one.
Another problem is the fact that not all wood has the same properties. Wooden can split or crack, while some woods may warp. You must take these things into consideration before purchasing wood.
What type of tools does a carpenter use?
The most common tool used by carpenters is a hammer. A hammer can be used to drive nails into wood. They can also use it to hold the pieces together as they work on a project. Other tools include clamps. pliers. screwdrivers. measuring tape. pencils. saws. drills. wrenches.
Statistics
- The U.S. Bureau of Labor Statistics (BLS) estimates that the number of jobs for woodworkers will decline by 4% between 2019 and 2029. (indeed.com)
- Overall employment of woodworkers is projected to grow 8 percent from 2020 to 2030, about as fast as the average for all occupations. (bls.gov)
- Average lumber prices rose about 600 percent between April 2020 and May 2021. (familyhandyman.com)
- Most woodworkers agree that lumber moisture needs to be under 10% for building furniture. (woodandshop.com)
External Links
How To
How to stain wood
The process of staining wood involves the application of chemicals to the wood's surface, which causes it to change its color. This chemical reaction causes the wood to change from white to brownish red. Oak is the most commonly used wood for staining, but other woods can also be stained.
There are many ways to stain wood surfaces. Some methods involve mixing the stain with a solvent (such as turpentine) and then brushing or spraying the mixture onto the wood. Others use a solution made up of water and dye, which is then applied directly onto the wood. It is possible to mix stain into varnishes and paints, making it part of the finishing coat.
Preparing the surface for staining wood is the first step. The wood must be thoroughly cleaned to remove all grease and dirt. Sanding smoothens any scratches or rough spots. Next, you need to decide which stain you want. There are two main types of stain: non-penetrating and penetrating. Penetrating stain penetrates deeper into wood than nonpenetrating, making them suitable for dark colors like mahogany. Penetrating stains are best paired with lighter colors, such as maple.
After you've decided what type of stain to apply, get ready for your tools. The best tool for applying stains is a paintbrush. It allows you to evenly distribute the liquid over the surface. To remove any stains left behind after painting, you will need some rags. If you plan to mix the stain yourself, make sure you have enough containers available to hold the different components of the mixture.
After you have prepared your materials for staining, clean the area. You can remove grime and dirt with warm water and soap. Wipe down all furniture pieces with a dampened cloth and clean water. If you intend to stain darker wood, make sure you get rid of any debris.
Apply the stain next. Next, apply the stain to the furniture by starting at one end. Slowly and carefully move along the grain of wood, slowly but steadily, until you reach the other end. Be careful not to let the stain drip off the wood's edge. Before you proceed with the next steps, let the stain dry completely.
Clear polyurethane is used to protect the painted surfaces. Apply three coats of polyurethane sealer. Let the third coat dry overnight before you sand the final coat.