
A beginner woodcarver might not know where to begin. Here are some tips and tricks to help you get started with your first animal carving job.
Dog
There are many free wood carving patterns that you can download for your dog if it's an aspiring woodcarver. These patterns will guide you in carving your dog in a variety of styles and dimensions. Here are some of the tools you will need to carve your dog. You'll need a bandsaw or coping saw, chisels (or a mallet), and time to sharpen. Next, you will be ready for carving!
Eagle
Native Americans regard the baldeagle as a traditional symbol for strength, courage, wisdom, and perseverance. Its primary purpose was to be the creator's messenger. It measures approximately 20 inches in size and 5 inches wide. The eagle today is a popular choice in wood carvings. There are many woods that can be used to carve eagles, including modern and antique. This article will show you some of the most common wood carving styles.
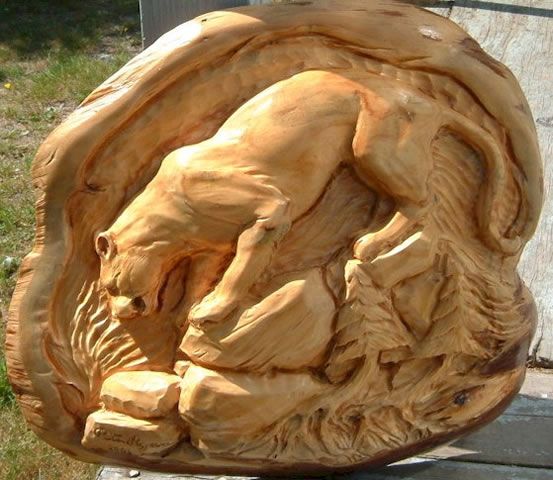
Bear
Carving a bear is simple and straightforward. Each line is heavier than the previous. The front paws of a bear are angled opposite the leg lines for added visual interest. If you're new to wood carving, consider purchasing a book that teaches beginners how to create a bear. James Miller's book shows the entire process.
Elephant
A wood elephant carving can add a unique touch to your home. 1stDibs offers 56 antique carved wood elephants, as well as two modern pieces. These pieces are a classic design that dates back to the 19th Century and have seen increasing popularity in recent times. You have the option to choose from Art Deco or Mid-Century Modern styles. Or, you can pick a smaller piece that will add a subtle touch of elegance to your home.
Moose
Wood carving of moose can be a rewarding experience. Dowels can be used to attach antlers or paddles to moose. Push them in, or glue them in. After that, you can paint the moose with a walnut gel stain or use paint to color the moose.
Template for Moose
A template for moose carving allows carvers to produce realistic-looking carvings. You can paint moose carvings or stain them with walnut gel. After you've learned the basics it is simple to carve this creature. To finish the project, you can use a brush to add fur and eyes or a typhoon tool on a grinder to grind details. The Moose template can be used by beginner wood carvers to create an animal.
Bear template
A template is necessary to begin carving bear wood. To explore the wood's features, you can use a Dremel to create a template. This tool allows you to use stop cuts in order to separate the legs from their lower bodies. To indicate the split, you can make V-cuts in your legs. Once you are done with the leg and ear sections, you can finish the underbelly. To shape the bear further, make sure you leave a little space at the rear.
Eagle template
Three detailed templates are needed to carve an adult eagle. One template is needed for carving the eagle, while the other one will be used as a work paper template. This will allow you to cut out patterns and use the working paper. The third template serves as a guide. You will then use the available tools to cut out the main lines. Cut the lines so that they are close to the pattern. All marks should be aligned.
Template for the mouse
If you're new to wood carving, you'll find that there are several different designs to choose from. This will make your job easier. If you are a beginner, you can start with a simple pattern. As you gain experience, you will be able to move on to more complex patterns. Once you master the basics of mouse design, you'll be well on your way to designing the perfect mouse.
FAQ
What is the main difference between plywood or particle board?
Plywood consists of layers made from wood and pressed together by pressure. Plywood comes in several thicknesses and is commonly used for cabinets and flooring. Particle board consists of sawdust mixed and resin. The resin is then compressed into large blocks. It's commonly used for home improvement projects. Both types of boards are durable and easy to cut.
What is the difference between a hobbyist or a professional woodworker, and how can you tell?
Hobbyists love making things from wood while professionals are more concerned with the quality of their work. Hobbyists tend to take pride and share their creations with family and friends. Professionals will spend hours researching designs before they begin working on a project. Professionals will be meticulous about all aspects of their work, from selecting the right materials to finishing it.
How much should a hobbyist invest to get started?
A lot of capital is required to purchase the necessary supplies and tools if you want to start your own woodworking shop. It's a good idea to buy a small tablesaw, drill press and circular saw. These items are affordable so you won’t break the bank.
What kind wood should I use for my project?
The most popular types of wood used in woodworking include oak, pine, birch, maple, cherry, mahogany, teak, poplar, redwood, and bamboo. Each type of wood has unique characteristics that affect the look and feel of the final product. For example, oak tends to be darker and harder than other woods. Birch is soft and lightweight, while mahogany is denser and heavier. You can also choose between solid wood and veneers. Veneers are thin sheets of wood that are glued together to form a single layer.
Statistics
- Most woodworkers agree that lumber moisture needs to be under 10% for building furniture. (woodandshop.com)
- The U.S. Bureau of Labor Statistics (BLS) estimates that the number of jobs for woodworkers will decline by 4% between 2019 and 2029. (indeed.com)
- Average lumber prices rose about 600 percent between April 2020 and May 2021. (familyhandyman.com)
- In 2014, there were just over 237,000 jobs for all woodworkers, with other wood product manufacturing employing 23 percent; wood kitchen cabinets and countertop manufacturing employing 21 percent. (theartcareerproject.com)
External Links
How To
How to make wooden joints
This tutorial will show you how to join two pieces of wood together. We'll use the "pocket hole joint," which means we drill holes in the wood and then glue them together. If your wood has a straight grain, smooth surface, you can use this method. You may want to consider other methods, such as dowel joining. Here are the steps
-
Drill Pocket Hole Joints. Start by measuring and marking the spot where the pocket hole joint will be placed. Next, drill 3/4 inch holes in each end of each piece using a handheld drilling machine or jigsaw.
-
Sand Smooth. Sanding the wood's edges will ensure that the joint doesn't split.
-
Glue Together Apply glue to both the ends of the wood. Let it sit for about 5 minutes before clamping the pieces together.
-
Secure the pieces together. Once the glue has dried, clamp the pieces together so they are flush.
-
Trim Joinery. Trim any excess wood surrounding the joint once the glue has dried completely.
You should leave enough space between the pieces to allow you to turn them inside-out.